Monday, March 15, 2010

Olive Oil Dip


I made Ciabatta Bread for dinner tonight and my sister suggested I make an oil based dip for it. So I looked up a few recipes and invented!

  • 1/2 cup olive oil
  • 1 tsp balsamic vinegar
  • 1/8 cup mixed herbs I  used a mixture of chives, rosemary, basil, thyme and Italian seasoning.
  • 1 or 2 garlic cloves - minced
  • 1/8 cup Parmesan Cheese
  1. Pour the olive oil into a bowl and mix in the herbs, balsamic vinegar and minced garlic (I put everything in a food processor for a few seconds)
  2. Refrigerate until ready to serve (make at least 30 minutes ahead of time but not more than two hours ahead of time, I read that's not a good idea)
  3. Right before serving mix in the Parmesan
Everything can be adjusted to your taste. My sister added some salt to hers and I think it tastes better with a bit of salt in it.

Ciabatta Bread


A couple of days ago whilst Stumbling I came across a recipe for One-Minute Bread. The titled had me intrigued and I had to know just how one can make bread in 60 seconds. Well, obviously you can't have the finished product in 60 seconds, but you can mix all the ingredients in that amount of time.

You will need:

  • 2 cups warm water
  • 1/4 tsp dry yeast
  • 4 cups flour
  • 1 tsp salt
  1. Mix the yeast and warm water in a large bowl.
  2. Add the flour and salt and mix with a spoon until well mixed.
  3. Cover with plastic wrap or a dish towel and place somewhere safe for 8-12 hours. I left mine for 5 hours and it turned out nicely.
  4. Preheat the oven to 400
  5. Gently pour the dough onto a greased cookie sheet and sprinkle the top with dried oregano, basil, and rosemary.
  6. Bake for about 25-30 minutes depending on how crisp you like the crust.


     We ate this bread for dinner with an Olive Oil dip. It was rather tasty!

    *I just have to add a note, my sister, her two boys and I ate half the loaf at dinner. Jessica's husband came in from work and ate the other half. If he eats that much of something, it's good.

    Deviled Eggs

    Yesterday I watched Julie & Julia. I. LOVED. IT! It’s an amazing movie and I found it inspiring – although I couldn’t stand Meryl Streep’s annoying high pitched voice. But it does add to her character. I was inspired to cook yesterday but I didn’t think a drippy nose belonged in the kitchen, so I stayed out. But here’s a recipe I tweaked Friday night.  I only used one egg and I didn’t measure anything. I think something like this should be made for your own taste.

    Deviled Eggs


    • 1 hard boiled egg
    • Mayo
    • Shredded Cheese (I used Kraft Mexican something or other)
    • Cajun Seasoning

    1. Cut your previously hard boiled egg length wise.
    2. Scoop out the yolk and place in a bowl
    3. Add mayo and cheese to the yolk and mash together
    4. Divide the yolk between the two egg halves and sprinkle with Cajun seasoning.

    Saturday, March 13, 2010

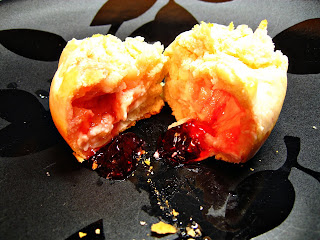
    Jelly and Cream Cheese Shells


    Almost a year ago my dear friend Michelle and I went to Arizona together in search of an adventure. We certainly had an adventure! We hiked a mountain, I almost stepped on a rattlesnake, we spent a day in Sedona and at the Grand Canyon and Michelle broke her leg. But none of that has to do with cooking, and this is a blog of food. While I was in Sedona, I picked up a jar of Prickly Pear Jelly and I just opened it today. IT'S SO GOOD! It's rather sweet but that's how I like my Jelly. I decided to make something but I didn't know what so I wandered into the kitchen for inspiration. I ended up making some jelly and cream cheese filled biscuits.  


    • 2 1/4 cups Bisquick mix
    • 2/3 cup milk
    • 4oz cream cheese
    • 8 tsp Jam/Jelly

    1. Preheat oven to 405
    2. Mix together Bisquick mix and milk
    3. Knead and add a bit more mix so the dough is no longer sticky
    4. Roll into a log and cut into 8 pieces


    5. Roll each piece into a thin circle
    6. Place each circle into a cupcake pan
    7. Put 1/2 oz of cream cheese in each shell

    8. Place 1tsp of jelly on top of cream cheese

    9. Pinch the extra dough together


    10. Bake for 12-15 minutes

    I want to try these again but with pastry as I think a lighter dough may go better.

    Sausage and Beef Meatballs


    • 1lb tube of sausage
    • 1lb ground beef
    • Spices - I only used a bit of garlic as the sausage was already spiced
    • 1 egg
    • Bread crumbs - I only had about 1/3 of a cup
    • 1/3 cup creamy salad dressing - optional. I used Caesar and I couldn't taste it in the meatballs
    • Butter for the baking dish - I used just over 1/8 of a cup in each dish

    1. Pre-heat oven to 350
    2. Put about 1/8 cup of butter in the bottom of a casserole dish
    3. Mix the sausage and beef together
    4.  Add the egg, spices, breadcrumbs, and salad dressing
    5. Form into balls and place in casserole dish
    6. Bake for 20 minutes
    7. Place meatballs on paper towel to drain the butter off so they don't become too greasy

      Tuesday, March 9, 2010

      Poached Eggs


      I made poached eggs for the first time last night. I also ate them for the first time last night. They are super easy to make and I think I will experiment with them in the future.

      You need:

      • As many eggs as you will eat (keep them cold)
      • 3 inches boiling water (I didn't really measure)
      • 2 Chicken or Beef Stock cubes

      1. Bring the water to a boil and stir in the flavor cubes
      2. Reduce the water to a simmer
      3. Doing one egg at a time crack into a bowl and pour into simmering water. I was able to cook 4 eggs at a time in the pot I used.
      4. Cook for about 5 minutes or until the yolk is as soft or hard as you want it. I found that a little hard to figure out and just stuck to the 5 minutes.
      5. Using a slotted spoon scoop the eggs out of the water and drain on the spoon or place on paper towel. 


      I've read that you can use tomato juice, wine, plain water, milk, broth, or other liquids to poach the eggs. I may try it in tomato juice one day but that just seems like a waste of tomato juice!

      Sunday, March 7, 2010

      Buttermilk Bicuits


      A couple of weeks ago I was craving Cracker Barrel biscuits and I found a recipe for them on CopyKat and having just made them, I'm quite pleased with the recipe.

      • 2 1/4 C. Bisquick Mix
      • 2/3 C. Buttermilk
      • 1 tsp. Sugar
      • 1 Tbsp. Butter, melted

      1. Preheat oven to 450 degrees. (I think that is too hot, I did this and the bottoms browned before the middle was done cooking, I'd say do it at 350 or 400 for about 15 minutes)
      2. Mix first three ingredients together, add melted butter and stir ingredients until soft dough forms. 
      3. Knead 20 times on a surface lightly dusted with flour then form into 9 balls. 
      4. Place biscuits in a 8x8 baking dish and slightly flatten
      5. Bake for 8 to 10 minutes. *see note on step one
      I like to put melted butter on my biscuits as soon as they are done baking.

      Friday, March 5, 2010

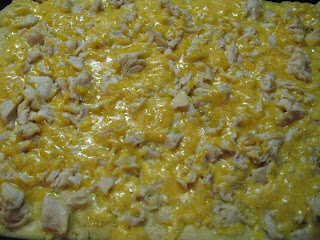
      Easy Pilsbury Pizza

      My Mum made this pizza a couple of time and I absolutely love it! I made it with my nephews today and it was a breeze.

      • 1 package Pilsbury (or other brand) crescent rolls
      • 1 can of chicken (I used a 10 oz can, more than enough)
      • 1.5 oz Honey Mustard Salad Dressing
      • As much cheese as you desire


       Preheat oven to 350F 
      Open the rolls and roll the dough out on a cookie sheet 
       
      Pour dressing on top and spread around
      Crumble chicken on top
       
      Sprinkle with cheese 
      Bake in the oven for about 7 minutes


      Sourdough Bread


      I love this recipe. It tastes better the older your starter is but it make soft loaves of bread that my 3 year old nephew describe as "verra goo" (very good) when his mouth was full of the bread.
      • 4 3/4 cups bread flour (I have no idea how much I use but I think it's more than this)
      • 3 tablespoons white sugar
      • 2 1/2 teaspoons salt
      • 1 (.25 ounce) package active dry yeast
      • 1 cup warm milk (I used sour milk last time and it added to the sourness of the bread)
      • 2 tablespoons butter, softened/metled
      • 1 1/2 cups sourdough starter
      • 1 extra large egg
      • 1 tablespoon water
      • 1/4 cup chopped onion (I have never had onions for the top)

      Directions

      1. In a large bowl, combine 1 cup flour, sugar, salt, and dry yeast. Add milk and softened butter. Stir in starter. Mix in about 3 3/4 cups flour gradually or however much you think you need.
      2. Turn dough out onto a floured surface, and knead for 8 to 10 minutes. Place in a greased bowl, turn once to oil surface, and cover. Allow to rise for 1 hour, or until doubled in volume.
      3. Punch down, and let rest 15 minutes. Shape into loaves. Place in two bread pans or shape into rolls or pretzels. Allow to rise for 1 hour, or until doubled.
      4. Brush egg wash over tops of loaves, and sprinkle with chopped onion. (I always forget the egg step)
      5. Bake at 375 degrees F (190 degrees C) for 20-30 minutes, or till done. (I find the pretzels and rolls take about 20 minutes and the loaves about 27)

      Sourdough Starter


      I love this Sourdough Starter. It’s really easy to do and maintain, as I’m sure they all are but other than Amish Enemy Friendship Bread I haven’t done any. I’ve only used this in one recipe and I’ll post that next. I’m going to try some other recipes at some point to see how they are.
      For this starter you will need:
      •    1  package active dry yeast (.25 ounce) (2½ teaspoons)
      •    2 cups warm water
      •    2 cups all-purpose flour
      •    Random amount of sugar*
      Directions
      1.    In large non-metallic bowl, mix dry yeast, 2 cups warm water, and 2 cups all purpose flour and cover loosely.
      2.    Leave in a warm place to ferment, 4 to 8 days. Depending on temperature and humidity of kitchen, times may vary. Place on cookie sheet in case of overflow. Check on it occasionally. I’ve never experienced overflow, mine doesn’t seem to grow much at all but I haven’t had a problem with the outcome of the bread so far so I’m sure it’s fine.
      3.    When mixture is bubbly and has a pleasant sour smell, it is ready to use. If mixture has a pink, orange, or any other strange color tinge to it, throw it out and start over. Keep it in the refrigerator, covered until ready to bake. My starter only bubbles for the first hour or so after adding to it and then it goes smooth and creamy.
      4.    When you use starter to bake, always replace with equal amounts of flour and water mixture with a pinch of sugar. *I don’t measure the sugar, sometimes it’s a tsp other times it is closer to a tbsp. So, if you remove 1 cup starter, replace with 1 cup water and 1 cup flour. Mix well and leave out on the counter until bubbly again, then refrigerate. If a clear to light brown liquid has accumulated on top, don't worry, this is an alcohol base liquid that occurs with fermentation. Just stir the starter to mix it in.

      Wednesday, March 3, 2010

      Raspberry Sauce


      •    1 pint fresh raspberries
      •    1/4 cup white sugar
      •    2 tablespoons orange juice
      •    2 tablespoons cornstarch
      •    1 cup cold water
      Directions
      1.    Combine the raspberries, sugar, and orange juice in a saucepan. Whisk the cornstarch into the cold water until smooth. Add the mixture to the saucepan and bring to a boil.
      2.    Simmer for about 5 minutes, stirring constantly, until the desired consistency is reached. The sauce will thicken further as it cools.
      3.    Puree the sauce in a blender or with a handheld immersion blender and strain it through a fine sieve. Serve warm or cold. The sauce will keep in the refrigerator for up to two weeks.


      I used two bags of frozen raspberries but I don’t remember what size. I think it was a bit less than half a pint extra. I didn’t drain the juice and I added a bit extra sugar but not too much as the cheesecake was sweet and I wanted a contrast. Straining took forever as I was using a tea strainer that sits in a teapot... VERY small holes!  The sauce thickens as it cools down so I had to heat it up a couple of times as it got too thick for the strainer.
      This sauce is good mixed into oatmeal or juices or pretty much anything you want to add raspberry flavour to, I like it stirred into Ginger Ale.
       
      There was quite a bit of sauce that didn't get strained but because of the seeds I didn't want to do anything with it. I am not a fan of raspberry seeds.

      Monday, March 1, 2010

      Cheesecake

      I did something on Friday that I have never done before. I made cheesecake *applause*. There are were about 100 1oz containers of cream cheese in the fridge so my sister, Jessica, suggested I make a cheesecake. So I found the top rated recipe on allrecipes.com and got to work.


      •    15 graham crackers, crushed (I used 1 cup)
      •    2 tablespoons butter, melted

      •    4 (8 ounce) packages cream cheese
      •    1 1/2 cups white sugar
      •    3/4 cup milk
      •    4 eggs
      •    1 cup sour cream
      •    1 tablespoon vanilla extract
      •    1/4 cup all-purpose flour
      Directions
      1.    Preheat oven to 350 degrees F (175 degrees C). Grease a 9 inch springform pan.

      2.    In a medium bowl, mix graham cracker crumbs with melted butter. Press onto bottom of springform pan.

      3.    In a large bowl, mix cream cheese with sugar until smooth. Blend in milk, and then stir in the eggs one at a time, mixing just enough to incorporate (I slightly beat the eggs before mixing them in). Stir in sour cream, vanilla and flour until smooth. Pour filling into prepared crust.

      4.    Bake in preheated oven for 1 hour. Turn the oven off, and let cake cool in oven with the door closed for
      5 to 6 hours; this prevents cracking. Chill in refrigerator until serving.

      Pretty straight-forward directions. I don’t know what I did wrong but my cheesecake cracked. Which I would be ok with had I not spent the evening before looking at pictures of cheesecakes and silently laughing at the cracked ones was ok with because my sister described it this way “Incredible cheesecake. Good enough to break my diet for cheesecake.” You need to understand, my sister is pretty much a cheesecake connoisseur so that says a lot! I love success stories from my kitchen!


      I also made a raspberry sauce to go on it. I will post that recipe soon.